15 DIY Christmas Village Display Ideas for a Warm Holiday Scene
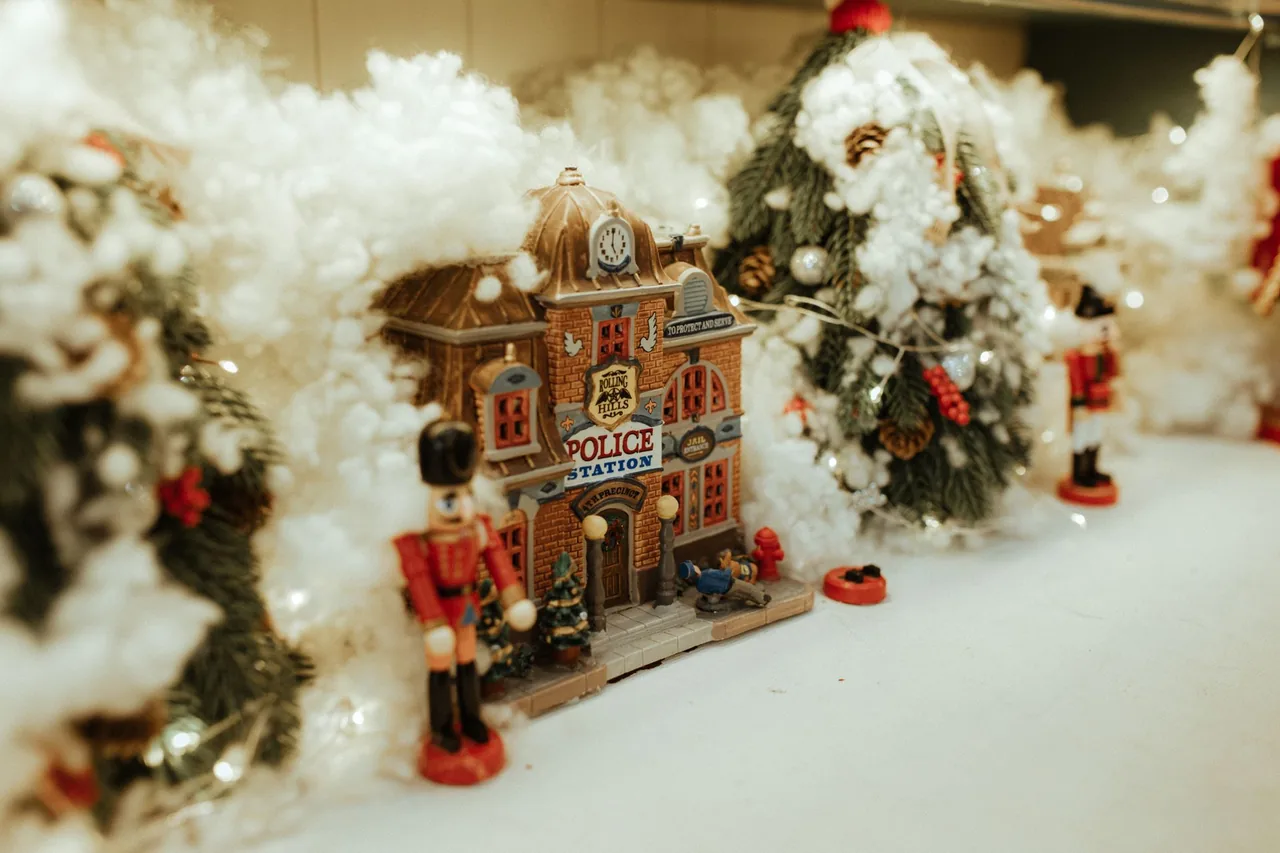
A tiny village glowing on a mantel or sideboard stops people mid-step. The lit windows, the snowy hills and the little trees lined up along a path make it feel like a whole town shrunk down to fit your living room. You don’t need a hobby shop budget to get that look.
The ideas below come from real displays. They include cardboard gingerbread rows, craft stick cottages, white ceramic houses on a console and a train rolling through a burlap town.
Some use houses you already own. Others start with a box, a few boards or a roll of cotton batting.
If you have been hunting for DIY Christmas village display ideas that work in a real home, this list covers small shelves, long mantels, kitchen islands and even a full porch. You will see how to build a base, where to put the big houses, how to hide cords and what to keep away from hot bulbs.
Pick the one that fits your space, gather a few supplies and start with the houses. The rest comes together one tree at a time.
1. Pastel Glitter House with Wreath Windows and Bottle Brush Trees
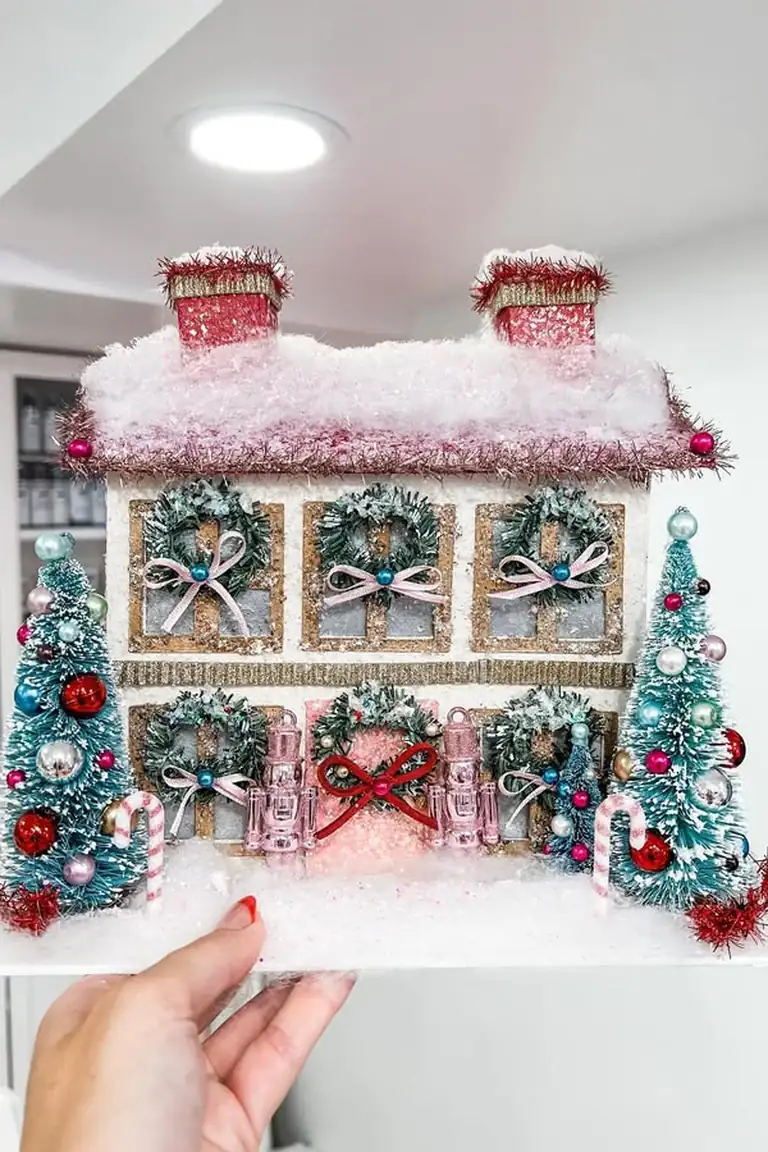
One small house can carry a whole display. This one sits on a white board with a layer of sparkly snow, and the details do the work.
Pink glitter snow covers the roof, with red and pink tinsel trim along the edge. Two red chimneys get the same tinsel. Every window holds a tiny wreath with a pastel ribbon bow, and two pink nutcrackers stand on the porch.
Two teal bottle brush trees frame the house, loaded with red, pink, silver and teal ornaments. Striped candy canes lean at the base. The palette stays tight, so the mix of pink, teal and red looks planned instead of busy.
The frame looks like a handmade paper or cardboard build, so you could start with one small box house. A foam board base keeps it steady and easy to move to a shelf.
Make a few in different pastel colors and you have a village without building one big scene.
Recreate this look
2. Cotton Batting Village on a Mid-Century Sideboard
Credit: Instagram
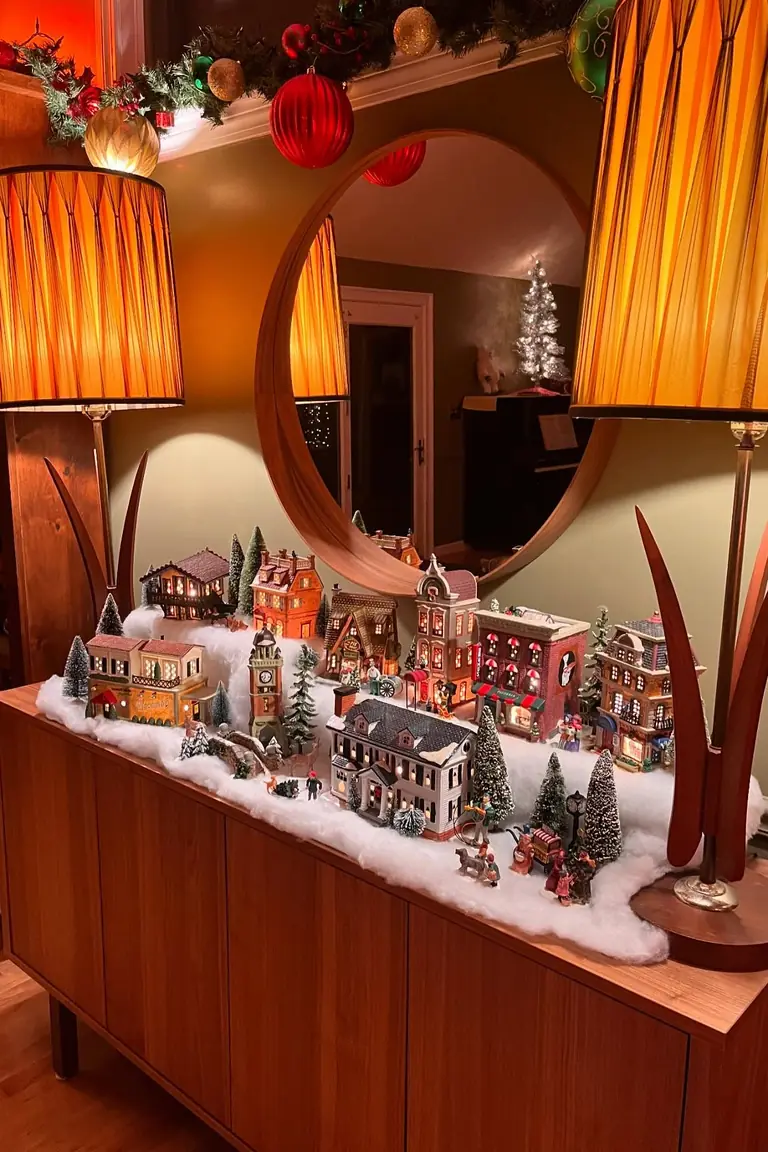
Warm lamps change how a village looks at night. Here, two tall orange shades flank the display, and the tiny lit windows glow back at them.
The base is a long strip of cotton batting laid right on the wood sideboard, with a wavy edge. A lumpy mound at the back lifts a few houses higher than the rest.
Back: the tallest buildings, including a brick row, a clock tower and a red shop with striped awnings.
Middle: a white house with dark shutters sits near the center and acts as the main piece.
Front: bottle brush trees, small figures and a horse cart fill the gaps along the snowy edge.
A round wood mirror sits behind and doubles the glow. A garland with big red and gold ornaments above ties the whole corner together.
Tuck each light cord behind its house so the batting stays clean.
3. White Ceramic Christmas Village on a Fluted Console Table
Credit: Instagram
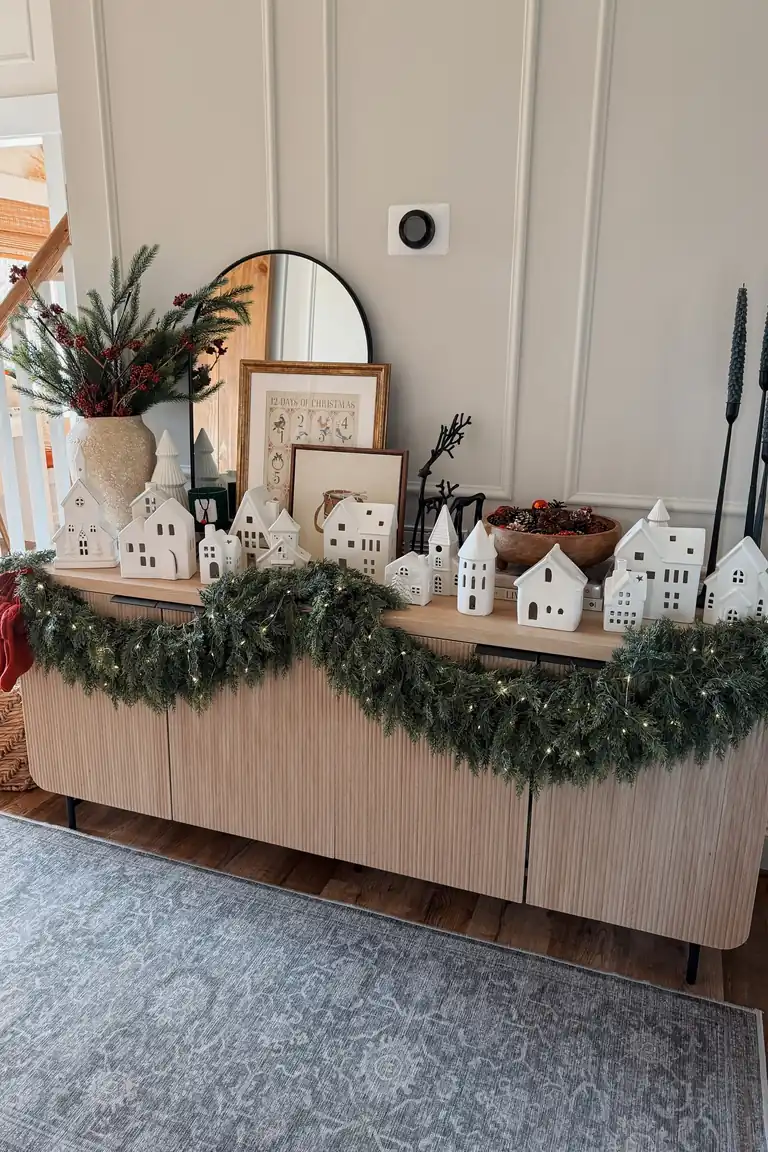
Plain white houses can feel calm instead of flat when the sizes vary. This group has tall steeples, wide cottages and small single-room houses, all clustered along the top of a light oak console.
A lit garland swoops across the front edge of the console in one long curve. It hides the gap between the houses and the cabinet, and the tiny lights pick up the white ceramic.
Behind the village, an arched black mirror, framed vintage-style art and a vase of berry stems build height. Dark pieces like black candlesticks and a reindeer silhouette add contrast, so the white houses stand out instead of blending into the wall.
Run the garland cord down the back of the console so nothing hangs in front.
💡 Quick Tip
Mix tall and short houses in loose clusters. Let a few touch so they read like a street, and leave a few standing alone like cottages on the edge of town.
4. Cardboard Gingerbread Houses in a Row on a Wooden Tray
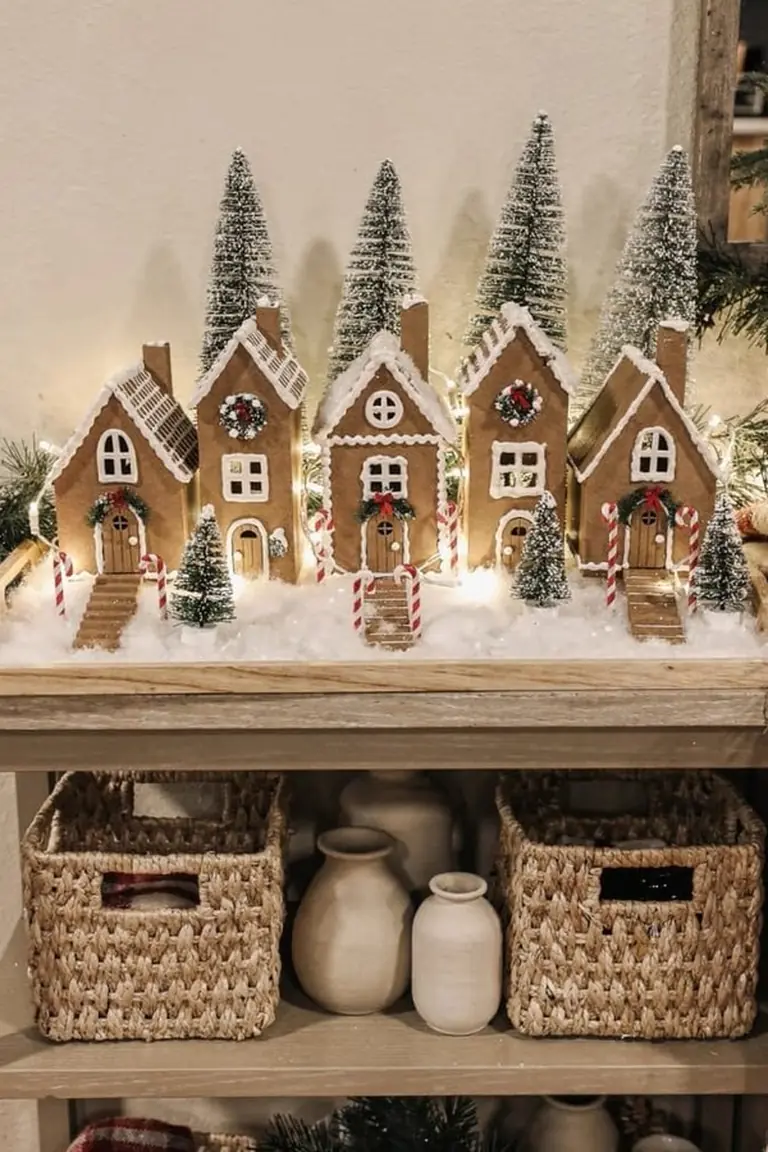
Five tall, narrow houses in kraft brown make a tidy street on a shallow wooden tray. White trim runs along the roofs and around the windows like icing, and each door has a small wreath above it with tiny steps in front.
The roof shapes change from house to house, with some flat-edged and some pointed. That small shift keeps the row from looking copied.
Bottle brush trees stand tall behind the houses, and short ones sit between them. Faux snow fills the tray, candy canes lean against the doors, and fairy lights wind through the snow and behind the walls.
Here is how to build a row like this.
Battery LEDs keep the glow warm without any hot bulbs near the snow.
Cut tall house shapes from cardboard, all the same height, with different roof angles.
Trace white trim around the roofs, windows and doors with puffy paint or paper strips.
Glue a mini wreath above each door and a few paper steps at the base.
Set the houses in the tray, add faux snow and trees, then tuck a battery light string behind them.
5. Colorful Painted Gingerbread Houses on a Staircase Console
Credit: Instagram
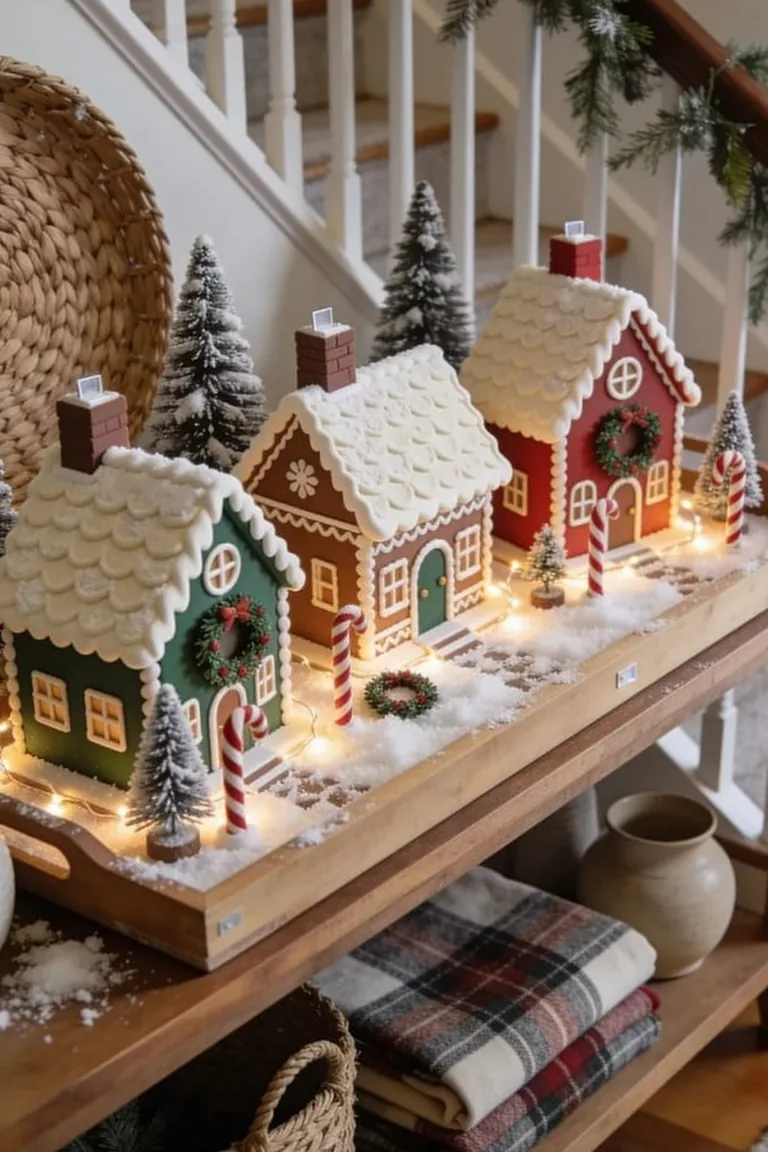
Color changes everything in this one. Three houses in green, brown and red stand side by side on a wooden tray with handles, set on a console beside a stair railing.
- Each house has a different wall color with cream trim around the windows.
- The roofs are covered in thick white scallops, like piped icing.
- Brick-style chimneys sit on top, each with a small tag or card on it.
- Wreaths hang on the doors, and candy canes lean at the front.
- Snowy trees sit behind and between the houses, with a string of lights along the front edge.
A tray works as a portable base. You can carry the whole scene to another room or lift it off the console in one move after the holidays.
Plaid blankets and woven baskets on the shelves below carry the same red and cream colors, so the display feels like part of the room.
Loose houses spread across a console, with cords hanging over the edge.
Houses, snow, trees and lights grouped on one tray, easy to move and store.
6. Oversized Gingerbread Village Porch Display with Candy Trim
Credit: Instagram
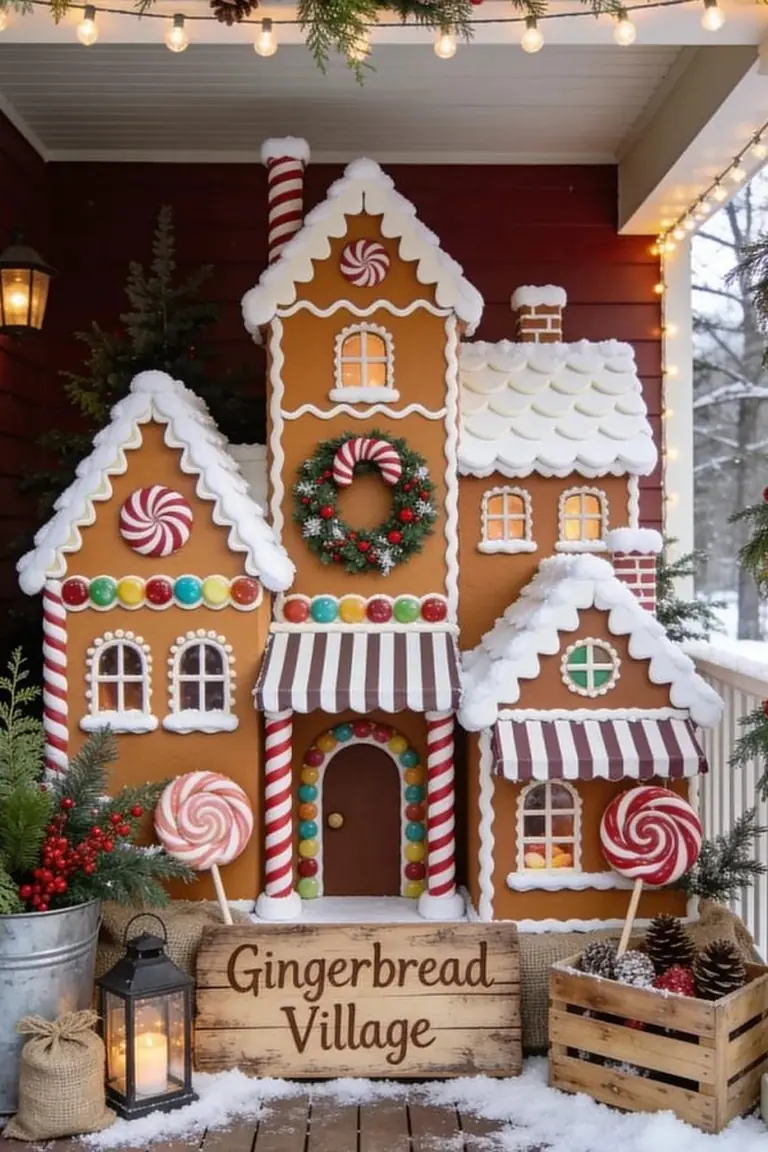
Big scale does the talking here. Tall gingerbread houses stand against a red wall on a covered porch, and a wooden sign reading “Gingerbread Village” names the scene for anyone walking up.
The details are what make it read as candy:
- White scalloped icing runs along every roof edge, like thick frosting piped in rows.
- Candy dot borders in red, green, blue and yellow cross the walls and frame the front door.
- Striped awnings and red and white pole columns mark the entrance.
- Big swirl lollipops stand in the snow out front, and the wreath has a candy cane at its center.
Props from around the house fill the ground level. A galvanized bucket holds greenery and red berries, a wooden crate holds pinecones, and burlap sacks and a lantern sit near the sign. String lights overhead finish the scene.
The houses look built at a large scale, so foam board or sturdy cardboard painted gingerbread brown is a good starting point. Cut paper scallops for the roof trim. Swap the lantern candle for a flameless one.
Build the houses from foam board and keep them under the porch roof.
Weigh down the back with a brick or heavy pot so wind can’t tip them.
Plain cardboard in spots where rain blows in.
Real flame candles next to paper, foam or fake snow.
7. Reclaimed Wood Scrap Houses Painted Red and Weathered White
Credit: Instagram
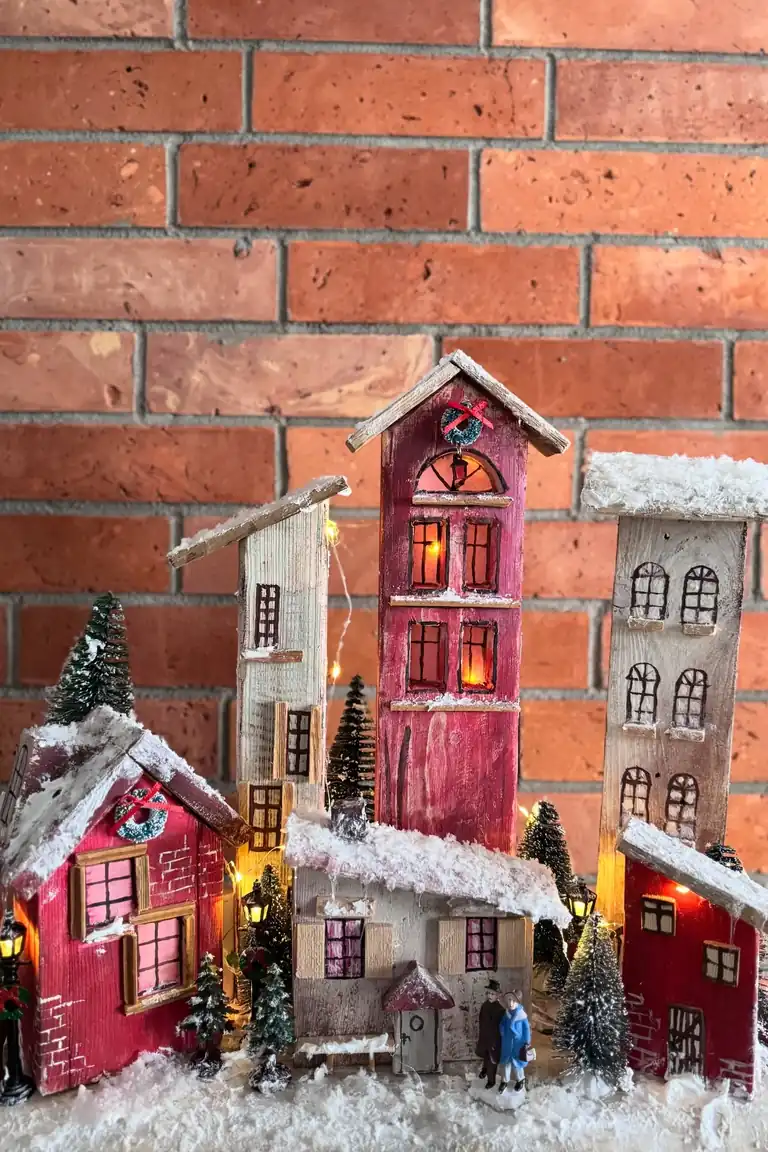
Scrap wood turns into a street when the houses stand at different heights. A tall red house with an arched window sits in the middle, a pale weathered one leans in on the left, and a gray one rises on the right. Two small red houses hold down the front corners.
The roofs are thin boards dusted with snow. Tiny wreaths hang on the gables, and a pair of small lamp posts, bottle brush trees and two little figures in front make it feel like a real town square. Warm lights glow behind the windows.
A red brick wall behind it is a bonus, since the colors match the paint. A plain wall works too, as long as it isn’t too busy.
For a similar look, use boards cut to different lengths and brush on thin paint so the grain still shows. Craft sticks work for window frames.
Keep the snow light on the roofs. A thin dusting looks better than a heavy pile on small pieces.
Supplies for a scrap wood street
8. Kitchen Island Centerpiece with Two Ceramic Houses and a Red Ornament Vase
Credit: Instagram
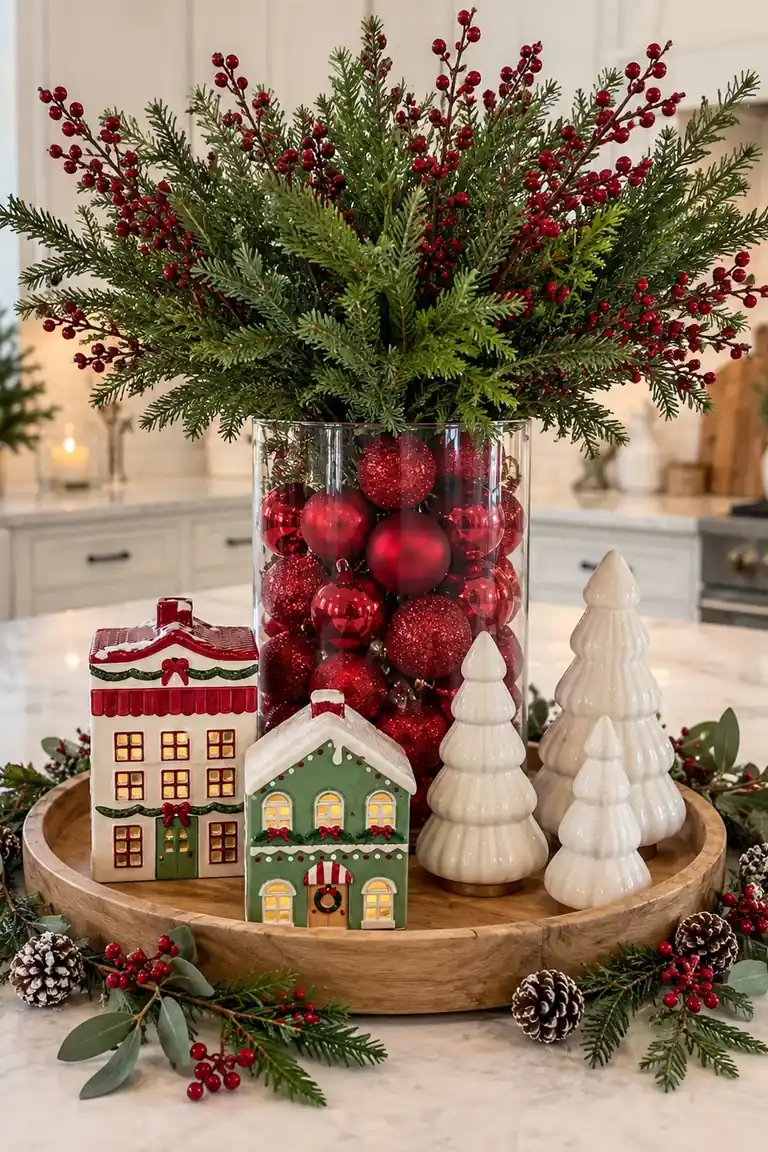
Not every village needs a snowy field. Here, two small ceramic houses, one red and white and one green, sit on a round wood tray beside three ivory ceramic trees of different sizes.
Behind them stands a tall glass cylinder packed with shiny red ornaments. Evergreen and red berry stems burst out of the top and add a lot of height. Pinecones and berry sprigs lie around the tray edge so the arrangement looks full from every side.
What works here: the heights step down from tall vase, to medium trees, to low houses, so your eye moves across the tray without getting stuck.
Easy swap: use any two houses you already own. Match the trim to the ornaments, and the red vase will tie everything together.
9. Woodland Village on a Round Wood Slice with Deer and Twig Lights
Credit: Instagram
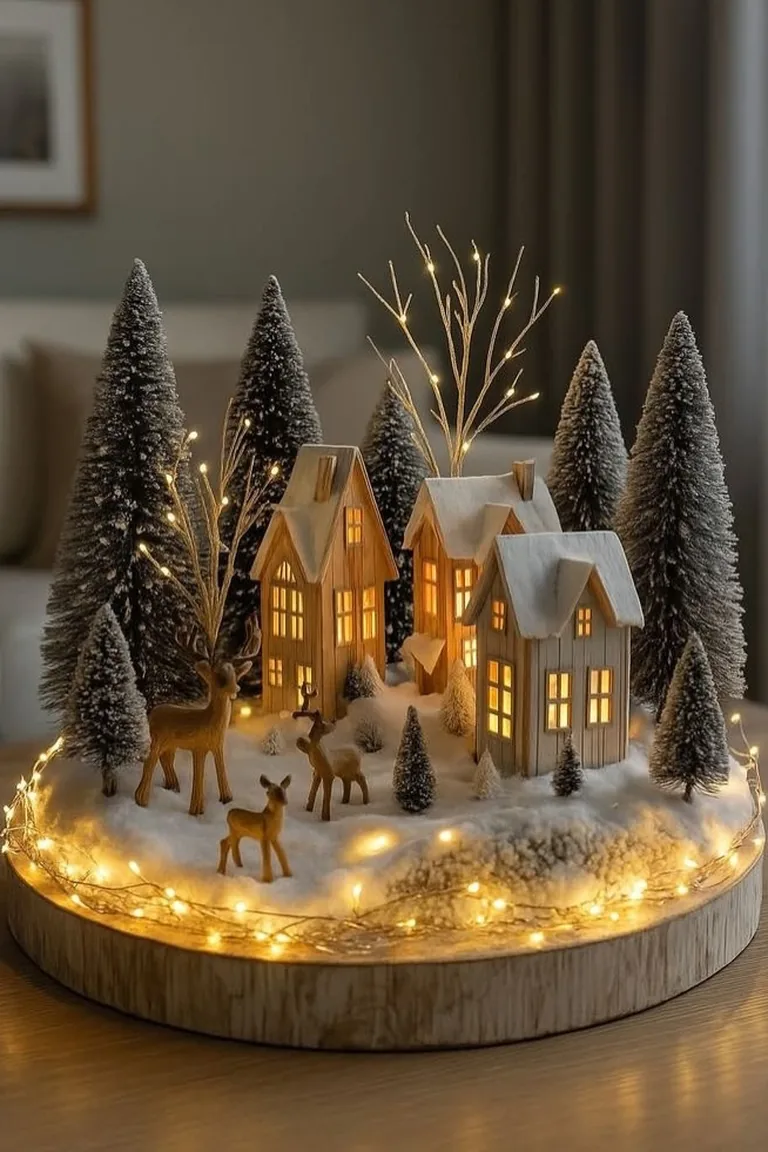
Light a round wood slice along its edge and the whole scene glows from below. Fairy lights wind around the rim here, and the warm color bounces off the snow in the middle.
Three light wood houses sit close together, each with glowing windows and snow-covered roofs. Tall dark bottle brush trees with a frosty finish stand behind them, and a few small ones tuck in at the front. Three small deer stand in the snow, and two bare branches strung with tiny lights rise between the trees.
It is compact enough for a coffee table, and the gray room behind it lets the warm light stand out.
Use LED lights only, so the batting stays away from anything that heats up.
Start with a round wood slice or a round board as the base.
Press cotton batting into a low mound, thicker in the middle than at the edges.
Set the houses in the center, tall trees behind and small deer in front.
Wrap battery fairy lights around the rim and hide the battery pack at the back.
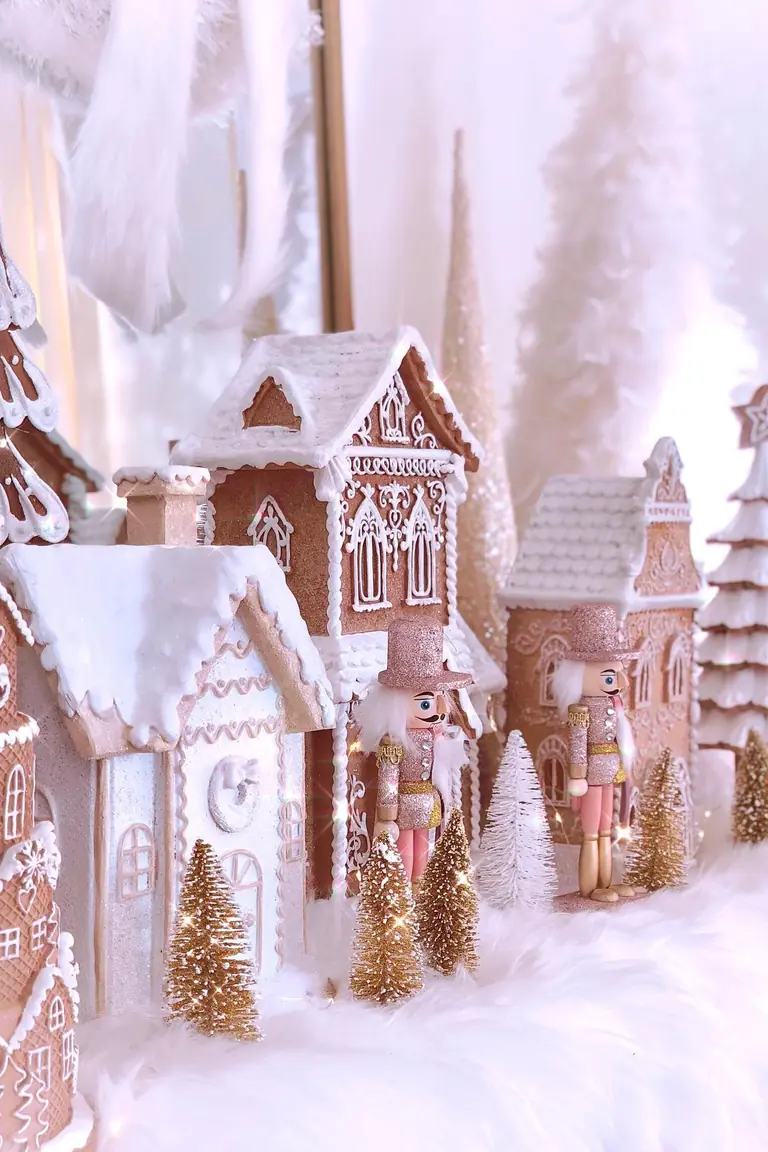
10. Blush Pink Gingerbread Village on a Faux Fur Snow Blanket
Credit: Instagram
Soft pink and ivory set this village apart from the usual brown and red. The houses are tan gingerbread with fine white piped patterns around the windows and along the roofs. The icing on the roofs looks thick and frosty, and a few surfaces have a light shimmer.
Pink glitter nutcrackers stand guard in front, and gold and white bottle brush trees fill the spaces between the buildings. A tall gingerbread tree and a tower with a star on top stick up above the houses and add height.
White faux fur runs under everything and works as snow. It is soft, it doesn’t shed like loose snow, and it packs flat after the holidays.
Pink, white and gold repeat in every piece, so houses, trees and nutcrackers read as one scene.
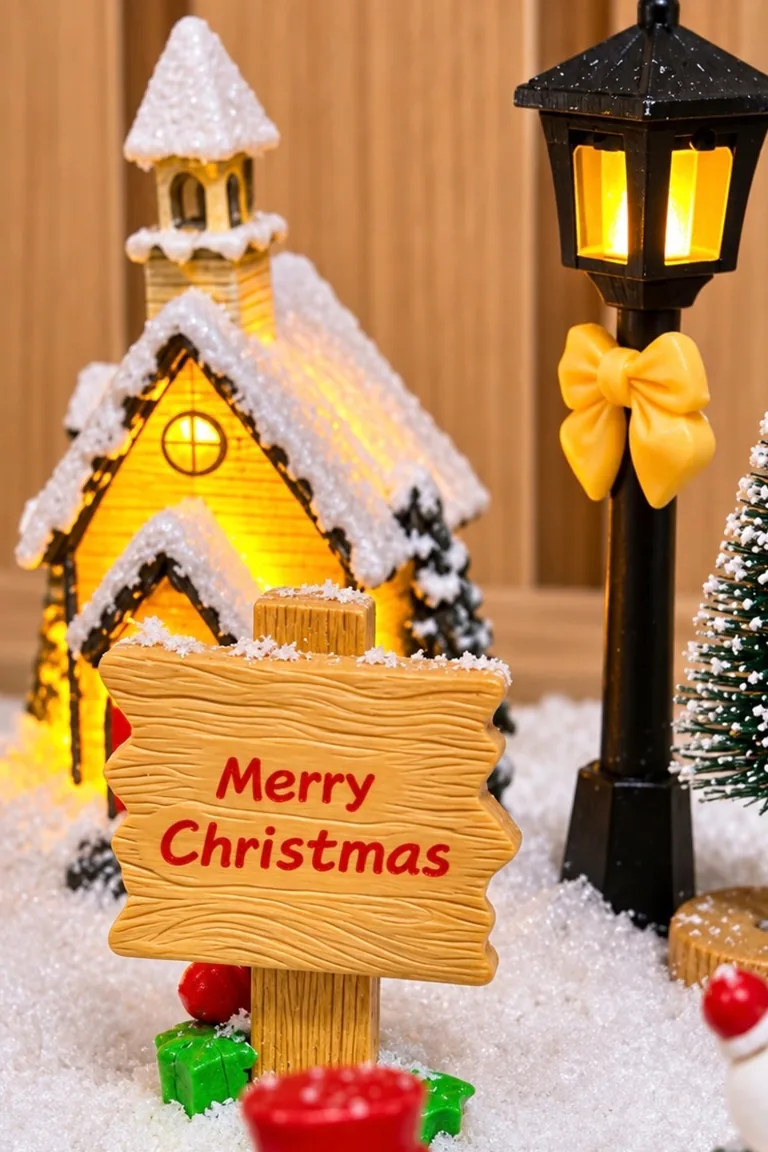
11. Glowing Chapel Scene with a Wooden Sign and a Bow-Wrapped Lamp Post
Credit: Instagram
A small church with a warm yellow glow can anchor a whole corner of the village. Its steeple and roof carry a thick coat of snow, and a round window glows from inside. A wood panel backdrop behind it makes the yellow light feel even warmer.
Two details give the scene a street-corner feel. A black lamp post with lit panes stands to the right, with a big yellow bow tied around the pole. A wooden sign reading “Merry Christmas” leans in the snow up front, with a few red and green pieces tucked at its base.
Sparkly faux snow covers the ground in a thick, even layer. A bottle brush tree with white-dotted branches sits on a little wood slice at the edge.
Use this idea when you have one favorite house and want it to look finished. A sign, a lamp and a tree are enough to turn a single piece into a scene.
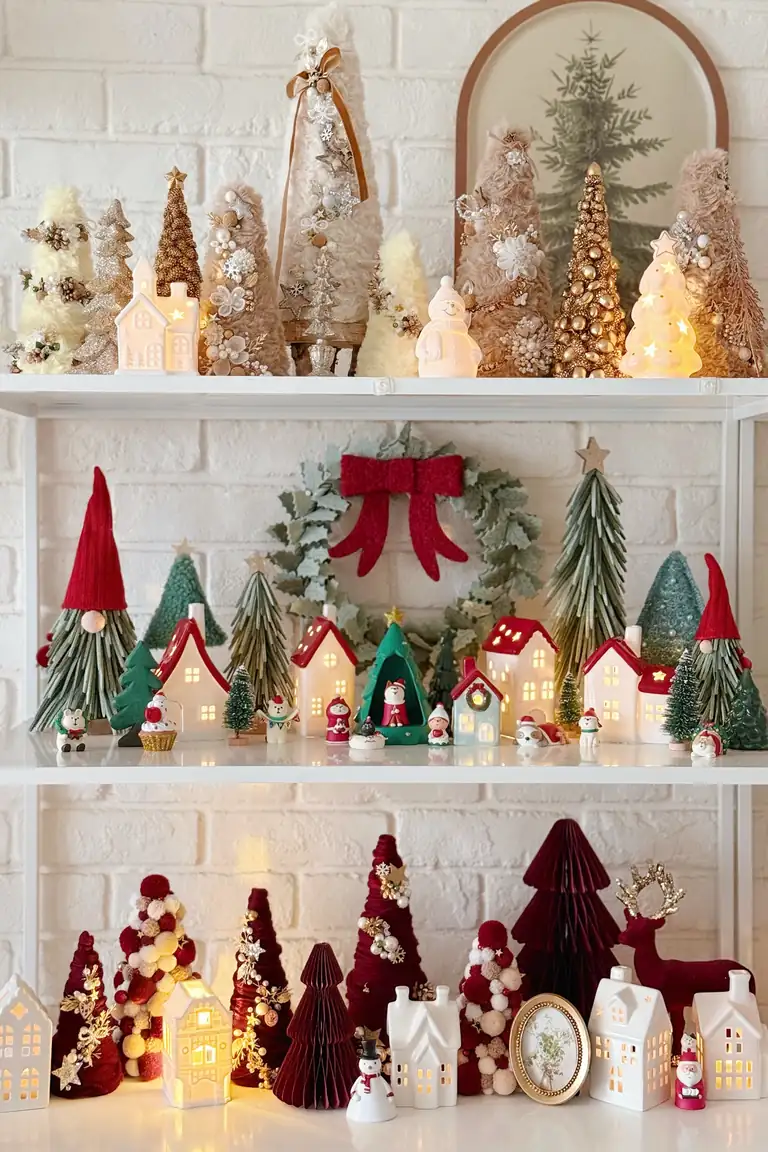
12. Three-Shelf Mini Village with a Different Color Story on Each Level
Credit: Instagram
Open shelves can hold a village too. These sit against a white brick wall, and each level has its own mood, so the whole stack feels like three small scenes instead of one crowded one.
Top shelf: cream, gold and blush tabletop trees in many textures, with a few white lit houses and a snowman tucked between them. Height comes from the trees, not the houses.
Middle shelf: a wreath with a red velvet bow leans at the back. Small houses with red roofs sit in a row, with green trees, gnome-hat trees and tiny Santa figures nearby.
Bottom shelf: deep burgundy. Paper honeycomb trees, beaded cone trees, a red deer and white lit houses keep it moody and calm.
Repeating white houses on every shelf ties the levels together. Because the colors change, nothing looks repeated.
| Shelf | Colors | Main pieces |
|---|---|---|
| Top | Cream, gold, blush | Textured trees, white houses |
| Middle | Red, green, white | Wreath, red-roof houses, figures |
| Bottom | Burgundy, white | Paper trees, deer, white houses |
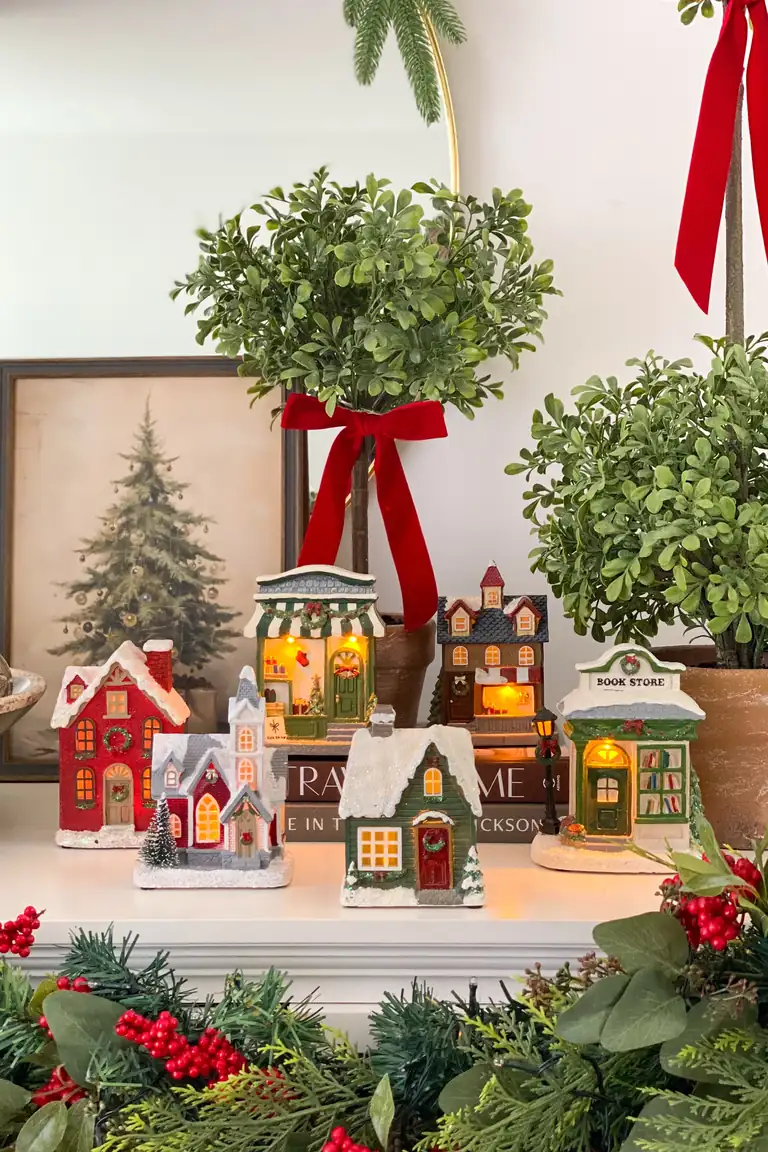
13. Ceramic Light-Up Houses on a Ledge with Boxwood Topiaries and Vintage Art
Credit: Instagram
Houses in mixed colors can still look related if the backdrop stays calm. Here, a red cottage, a green house with a red door, a striped-awning shop, a blue-roofed house and a small “Book Store” all stand in a loose line along a white ledge. Every one is lit from inside.
Two potted boxwood topiaries with red velvet bows flank the group, and a framed vintage print of a decorated tree leans behind them. A stack of books gives a few houses a little lift.
A garland of evergreen and red berries runs along the front, so the village seems to grow out of the greenery.
Houses with different roof colors need something that repeats. Here the red bows on the topiaries echo the red cottage and the red door, so the eye keeps moving across the ledge.
📌 Good To Know
Set a few houses on a stack of books to give them extra height. Pick books with plain covers, and put the tallest stack behind the shortest house.
14. Burlap Road Village with a Train Track and Vintage Toy Cars
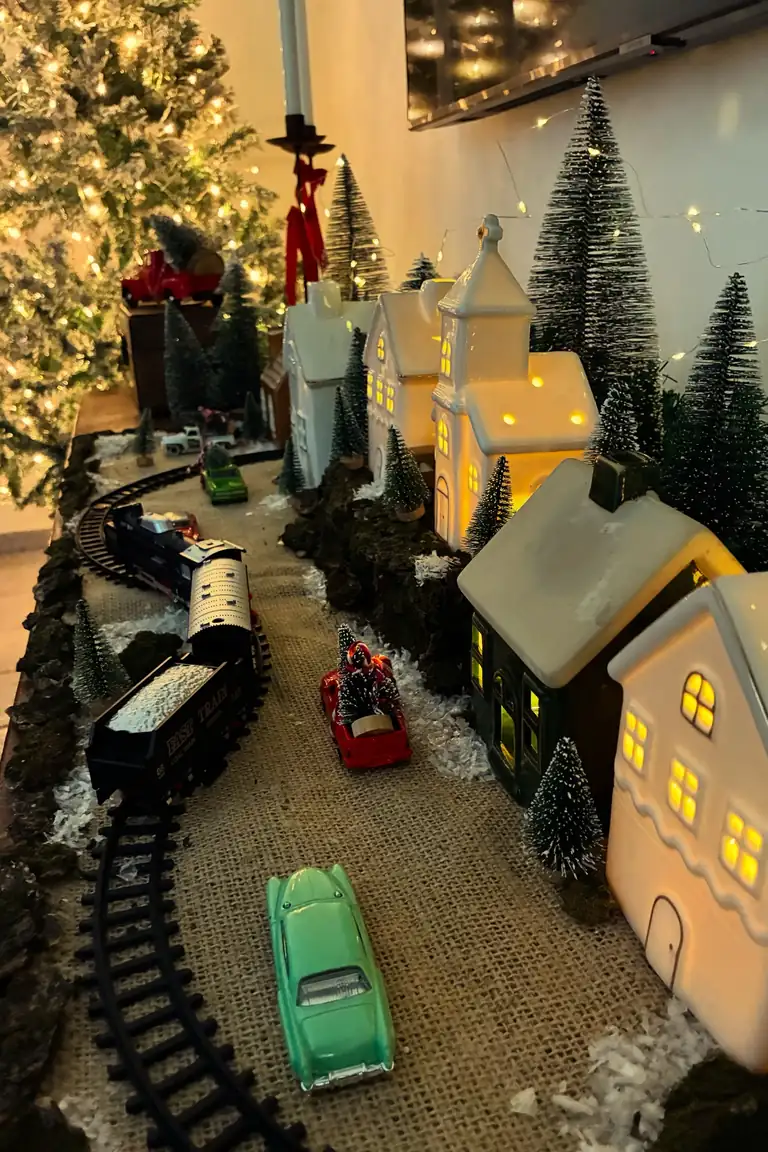
Credit: Instagram
Toy trains bring motion to a village, even when the train is standing still. This layout runs a black track around a burlap-covered table, with the train sitting on the curve at the back.
- The burlap works as a road, and it looks like a soft, woven street.
- Toy cars sit on it, including a mint green vintage car and a red one carrying a tiny tree.
- White ceramic houses glow along the right edge, and a taller one with a steeple stands near the back.
- Dark, rough terrain edges the table. It looks like rock or painted foam and frames the scene.
- Bottle brush trees, loose snow flakes and fairy lights fill in the details, and a frosted lit tree glows to the left.
The sizes of the cars and the train feel close to the houses, so nothing looks out of proportion.
Keep loose snow off the rails so the train can run, and tape any cords down along the table edge.
Lay burlap fabric over the whole table and smooth out the wrinkles.
Set the track first, then place the train so you can check the curves.
Add the houses along the edges and keep the middle clear for the road.
Finish with trees, toy cars and a light sprinkle of snow away from the track.
15. Craft Stick Houses with Burlap Walls and Glowing Fairy Light Windows
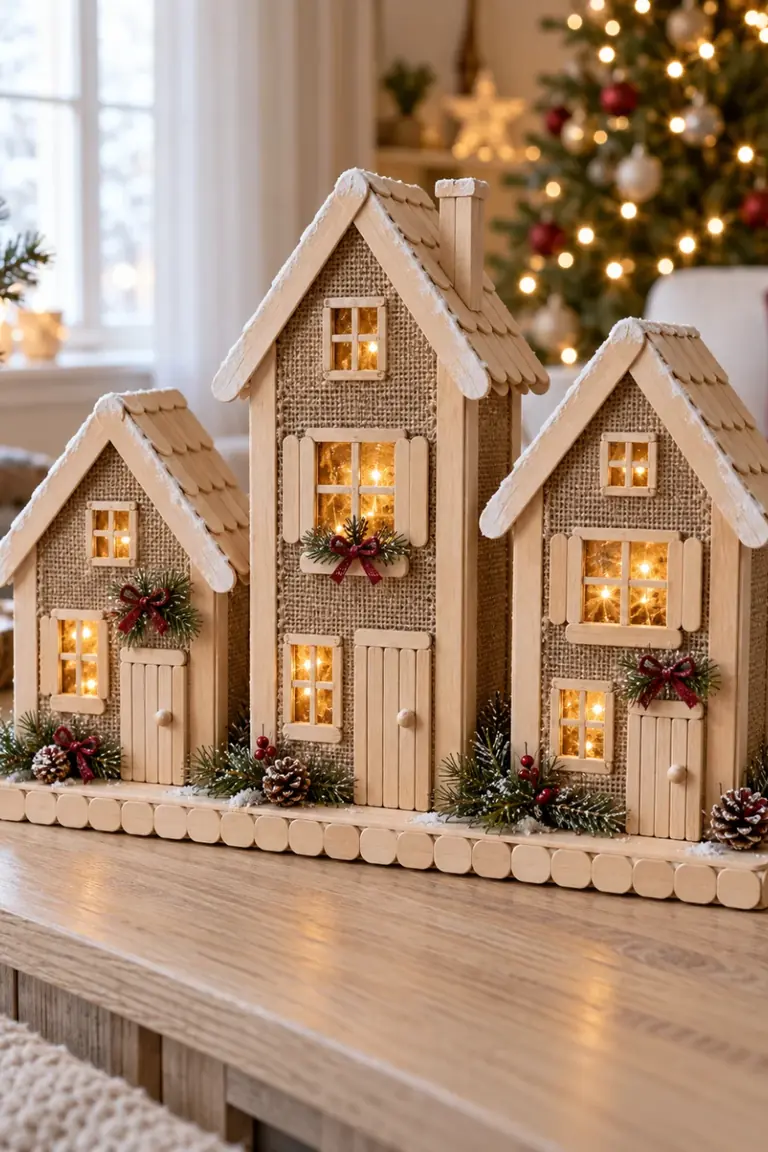
Credit: Instagram
Three tall houses in graduated heights show how far craft sticks can go. The middle house rises highest, with a chimney, and the two side houses step down on each side.
Rows of overlapping sticks make the shingled roofs, and the edges look whitewashed. Burlap panels fill the walls, and stick frames and shutters surround each window. Doors are built from vertical sticks, each with a tiny round knob.
Fairy lights sit behind the window panes, so the glow looks warm and sparkly. A little wreath with a red bow hangs near each door, and pinecones and evergreen sprigs line the base. The base itself is edged with round-ended sticks that look like a log fence.
Build the walls from a sturdy cardboard box or thick foam board so the sticks have something solid to hold onto. Keep to battery fairy lights, since hot bulbs and glue-covered sticks don’t mix.
Conclusion
Start with the space you have. A mantel or console wants a long street, a coffee table wants a round base, and a shelf wants small houses grouped by color. Use the ceramic houses you already own before buying anything new, then add cardboard, craft sticks or scrap wood when you want more.
Choose battery LED lights, hide the cords and keep cotton batting and faux snow away from anything hot. Match the style to your room, whether that means pink and gold, rustic wood or plain white.
Save this post for the next time you want fresh ideas, then pick one and start building.