15 Painted Christmas Ornaments You Can Make at Home
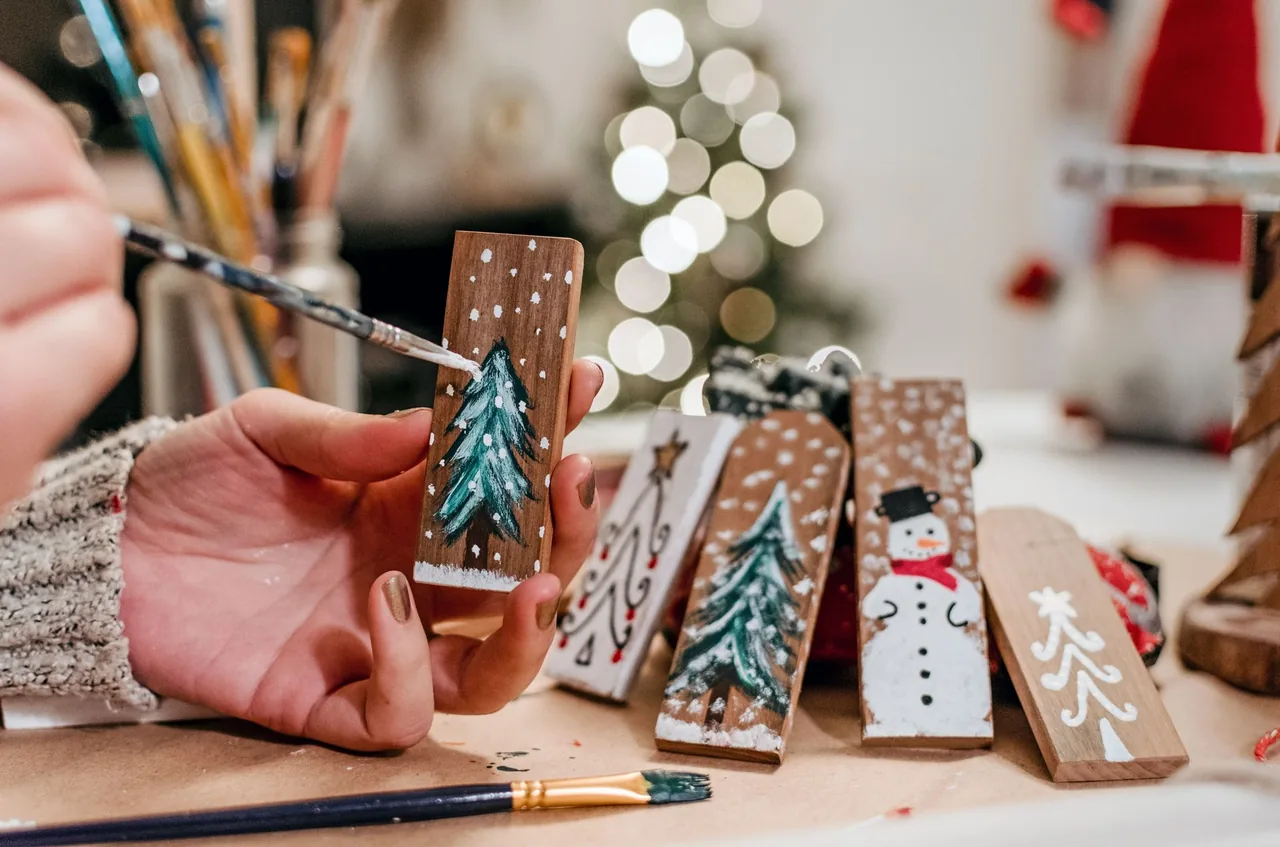
The ornaments people stop to look at on a tree are usually the ones made by hand. A little paint can turn a plain wooden disc, an old bauble, or a pine cone from the yard into something with real personality.
That is the charm of painted Christmas ornaments. They cost very little, they can carry a name or a year, and they let you match a whole tree to one color story without buying a new set.
This list has 15 ideas to try. You will find gingerbread house cutouts, Santa scenes on wooden rounds, tiny bears for a tabletop tree, brushstroke trees on glass, and a handprint Santa. There are also pine cones with pom-poms, mushroom ornaments with painted vines, hometown shapes, and a cardinal on a sage green bauble.
Some take ten minutes and a paint pen. A few need a quiet evening and a fine brush.
Each idea tells you what to paint, what to use, and how to keep it simple. Pick one, grab your paint, and start with the easiest. The old ornaments in your storage box might just be waiting for a fresh coat.
1. Gingerbread House Ornaments With Painted Pink Icing Details
Credit: Instagram
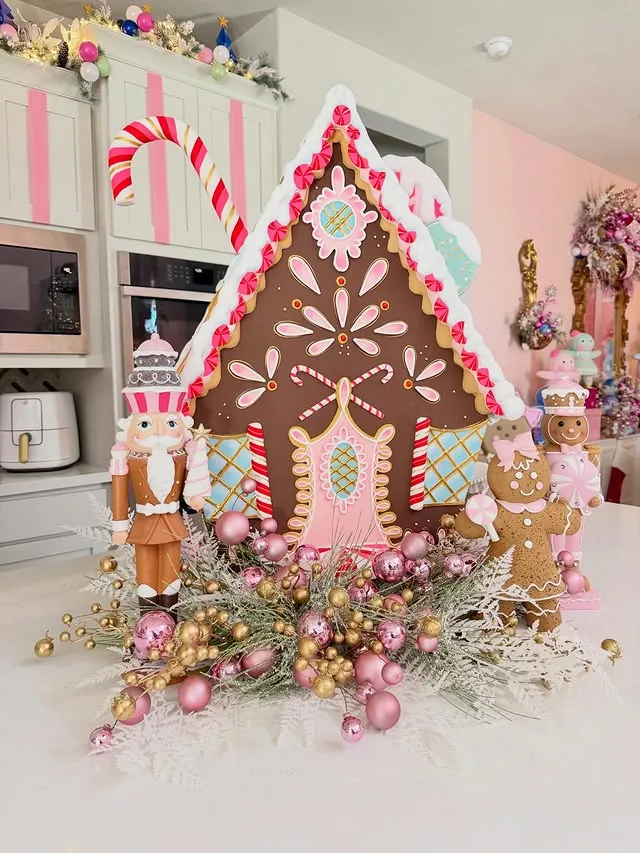
The icing is the whole trick here. On the house in the photo, it is just thin lines and dots of pink, white, and aqua on a chocolate brown base. The house itself is a large display piece, but the same look shrinks down well onto a small flat wooden ornament cut in a house shape.
Paint the base coat first and let it dry fully. Then use a paint pen or a small round brush for the details: scalloped trim along the roof, petal shapes in a fan, and a pink door with a diamond window.
A white band along the roof edge reads like snow. A few short red and white stripes make a quick candy cane touch.
Look at the pink and gold baubles piled at the base. Painted pieces look even better beside plain shiny ones, so you do not have to paint every ornament in the set. Seal the finished house with a clear spray sealer, used as the label says, before it goes on the tree.
2. Personalized Wooden Christmas Ornaments Painted With Santa Scenes
Credit: Instagram
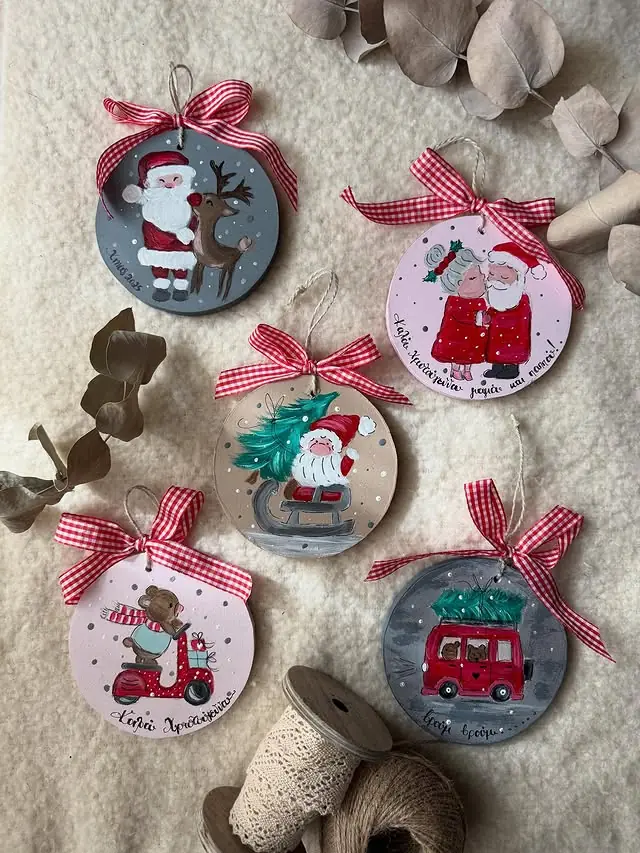
Five flat rounds, five little stories. One has Santa with a reindeer, one a sweet couple in matching red coats, one a bear on a scooter, and one a red van carrying a tree. Each background is a soft grey, blush, or tan, so the reds really show.
What ties the set together:
- White dots for snow on every disc
- Red gingham ribbon and natural twine for hanging
- A small hand-lettered greeting along the bottom edge
That last detail turns a simple wooden ornament into a personalized gift. Add a name, a year, or a short message with a thin paint pen once the painting is dry. Raw wood soaks up paint, so a thin white base coat first keeps the colors clean.
Sand the wood disc lightly and wipe off the dust.
Paint the background color in thin coats, drying between each one.
Sketch the scene in pencil. Paint the big shapes first and the small faces last.
Add the snow dots and the greeting with a white or dark paint pen.
Let everything dry fully, seal it, then tie on the gingham ribbon.
See also: 20 Christmas Tree Decorating Ideas
3. Tiny Bear Ornaments Painted on Dusty Pink Shapes for a Tabletop Tree
Credit: Instagram
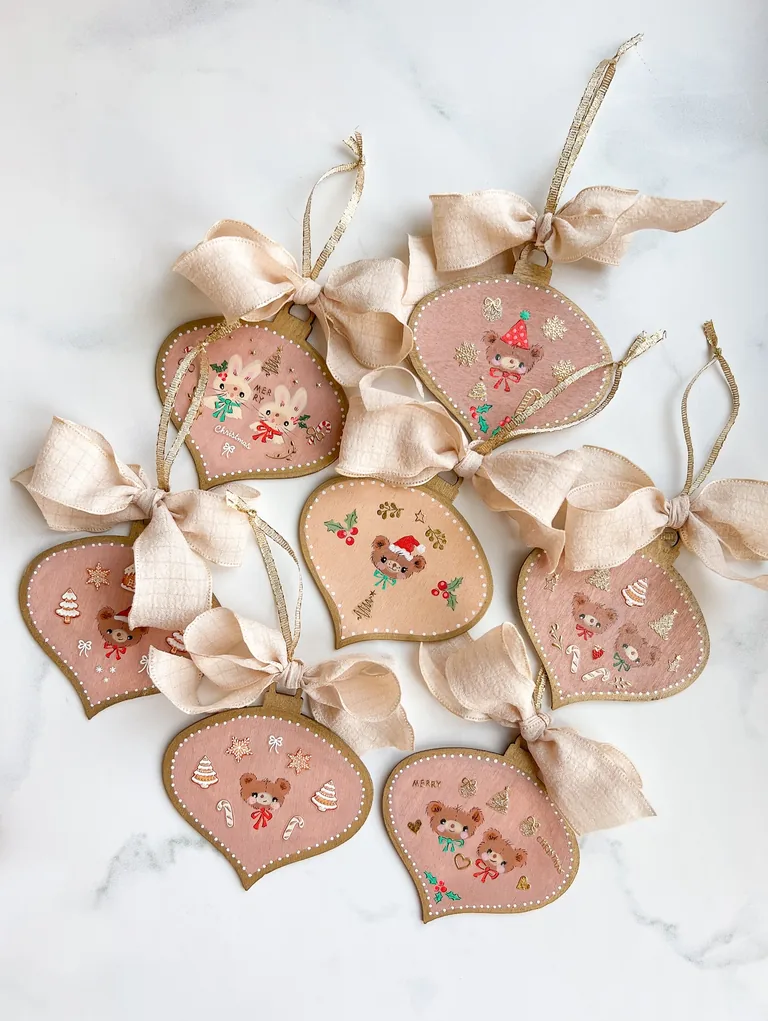
Small trees need small ornaments, and these are the right size. Each flat teardrop is painted dusty rose with a thin darker outline, then filled with tiny bear faces and little extras like mini trees and berries. A cream fabric bow on each one pulls the group together, even though the motifs are not identical.
A bear takes only a few moves. Two small ears, a round face, a dot nose, two dot eyes. Paint six or seven in a row and your hand gets faster by the third one.
The tree here is a small flocked one in a woven basket by a window, which shows how little space you need. Scrap fabric or leftover ribbon works for the bows, so there is nothing new to buy.
| Paint pen | Fine brush |
|---|---|
| Best for outlines, dots, and tiny eyes. | Best for filling faces and soft cheek color. |
| Easy to control, good for beginners. | Needs a steadier hand but gives softer edges. |
| Press lightly so paint does not pool. | Load only a little paint so small lines stay clean. |
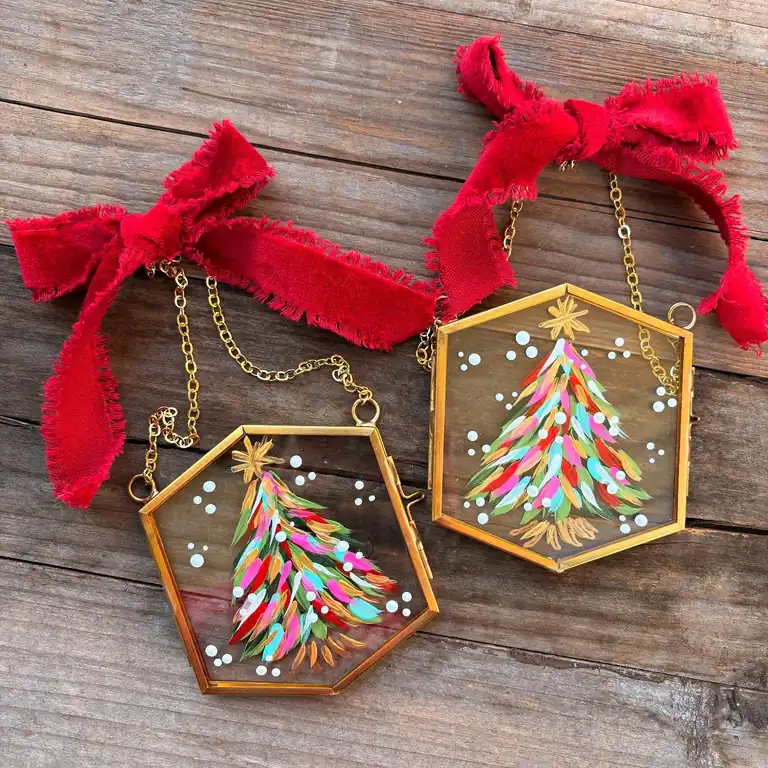
4. Glass Frame Ornaments With Colorful Brushstroke Christmas Trees
Credit: Instagram
Short, slanted strokes do all the work on these trees. There is no outline and no sketching, just overlapping dabs of green, pink, turquoise, red, and gold that stack up into a tree shape.
- Strokes: short and flat, all angled the same way
- Finish: white dots for snow and a small gold star on top
- Hanging: a gold chain and a frayed red velvet ribbon bow
The paint looks to be applied right onto clear glass inside a brass hexagon frame, so the colors can glow when light passes through. Wipe the glass with rubbing alcohol first so the paint grips.
Choose a paint labeled for glass and follow its drying directions. Handle the glass with care, and keep these away from small children and pets.
Let each layer dry before adding the next.
Practice a few strokes on scrap paper first.
Test the paint on a small corner of the glass.
Thick coats that drip or pool.
Touching wet paint to fix a stroke.
Hanging it before the paint is fully dry.
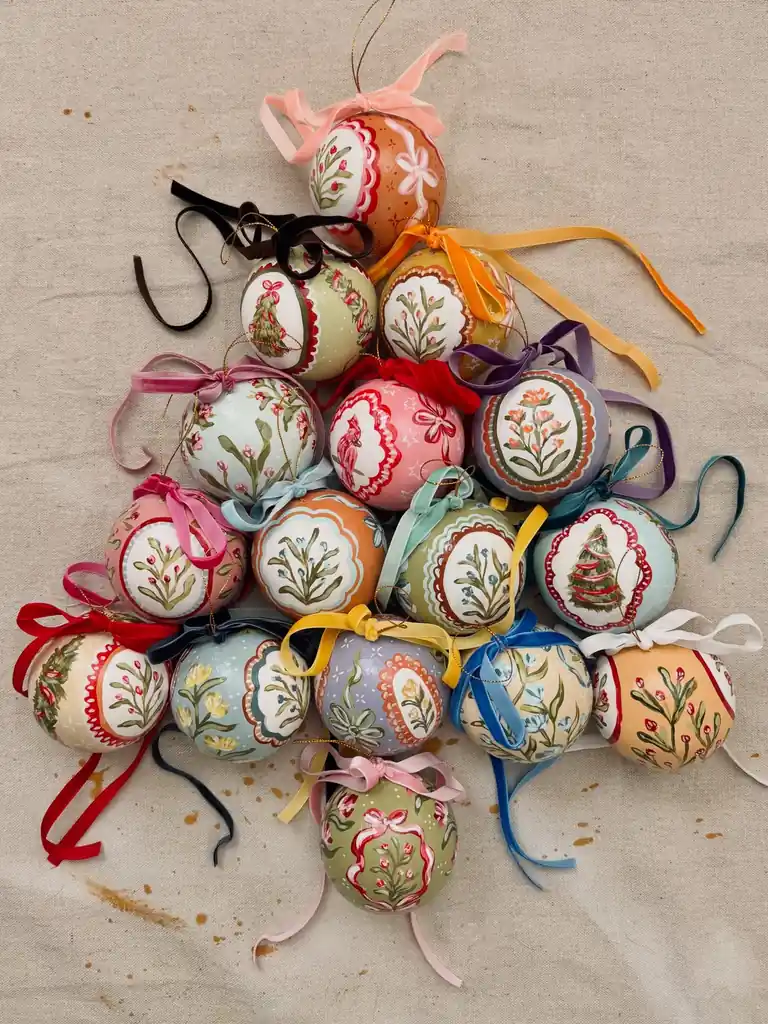
5. Painted Christmas Ornaments With Folk Floral Panels in Soft Pastels
Credit: Instagram
This is the detailed one, so save it for a quiet evening. Each bauble has a pastel base in peach, mint, blush, lavender, or soft blue.
A white scalloped oval sits on the front, outlined in red or green, and holds one small motif: a flowering sprig, a little tree, a red bird, or a bow. A velvet ribbon in a contrasting color finishes each one.
Keep it doable by picking one sprig and repeating it, then adding a bird or a tree to just a few for variety. Plain baubles you already own work well, as long as the surface is clean and matte. On plastic, a light sanding or a thin primer helps the paint grip.
The photo piles them into a tree shape on linen, which is a handy way to show off the set before anything is hung. Paint glass ones over a soft towel in case one slips.
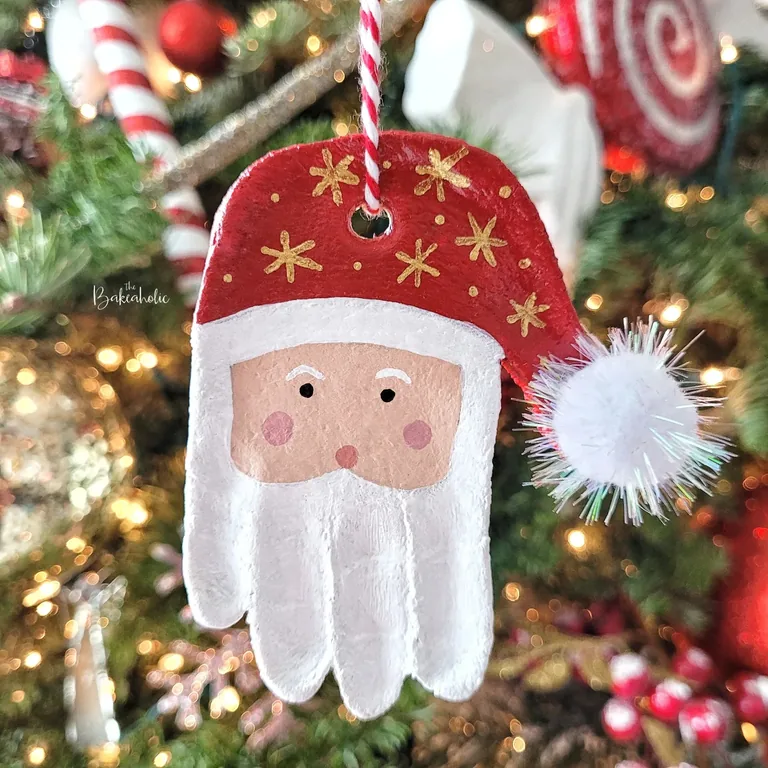
6. Handprint Santa Ornaments Painted With a White Beard and Gold Snowflake Hat
Credit: Instagram
A handprint makes the beard. Press a hand into the dough, cut around it, and the fingers become Santa’s long white beard.
The ornament looks like salt dough or air-dry clay, and that soft, slightly bumpy surface holds paint well. Let it dry fully, using whatever method your recipe or clay package gives, before you paint.
Beard: Two coats of white over the fingers and around the hat brim, so the texture still shows.
Face: A flat peach rectangle with pink cheeks and a pink nose. Two tiny black dot eyes and thin white brows finish it.
Hat: Red paint, then small gold snowflakes made from crossed lines and a few dots.
A glittery white pom-pom at the hat tip and red and white twine through the hole complete the look.
📌 Good To Know
Write the name and year on the back with a paint pen before you seal it. If the print comes from a child’s hand, that small detail is what makes it a keepsake years later.
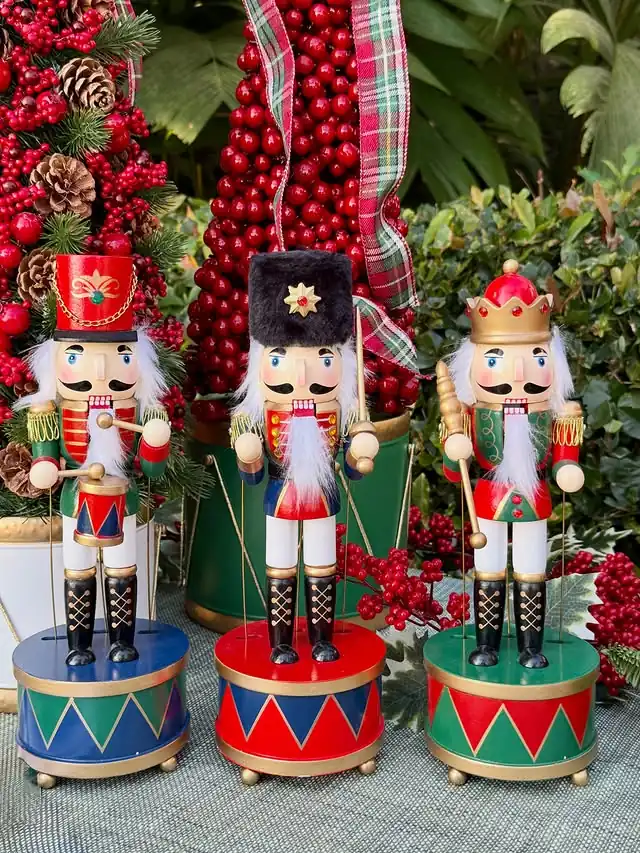
7. Painted Nutcracker Drum Patterns in Red, Green, and Blue
Credit: Instagram
Three nutcrackers, three drums, one trick. Look at the bases.
Each drum is a bold color with a row of triangles around the middle and a thin gold band at the top and bottom. The colors swap places from one drum to the next, so the set feels planned even though no two match.
The nutcrackers are larger decor pieces, but the drum pattern is easy to copy on a small wooden ornament, a wooden spool, or a round box lid. Paint the base color first.
Mark the triangle points lightly in pencil, then fill them in with a flat brush. Add the gold trim last with a paint pen.
Geometric designs need clean edges, so slow down on the triangles. On flat surfaces, painter’s tape can keep the lines sharp.
Use the same three colors on every piece and just swap which one is the base. The set looks matched, but nothing repeats.
See also: 25 Magical Christmas Decor Ideas
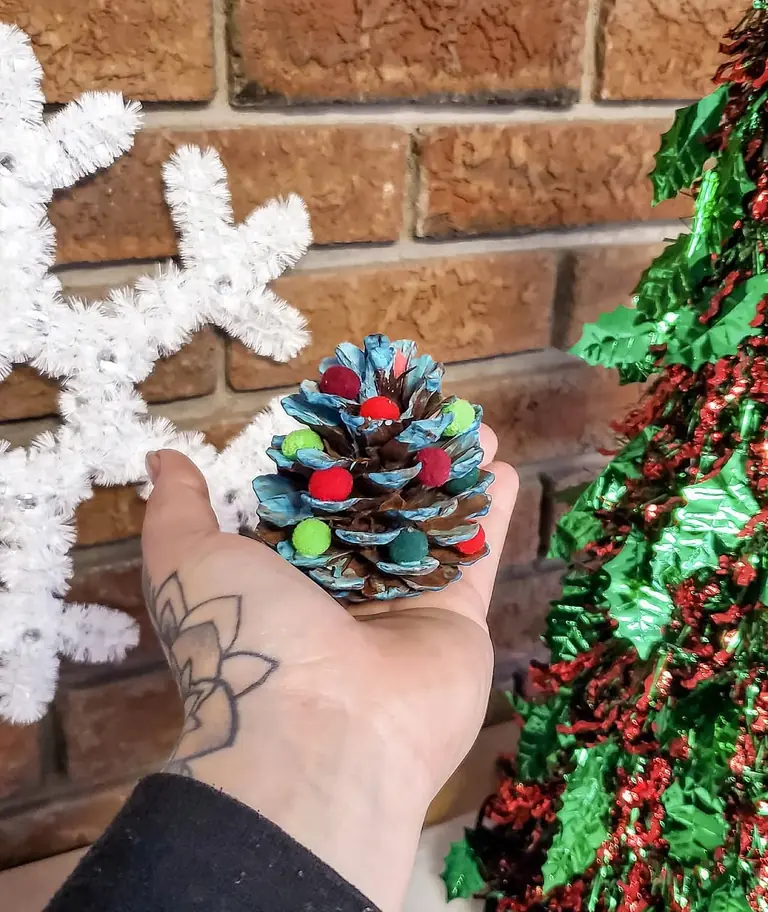
8. Pine Cone Ornaments Dry Brushed Icy Blue With Colorful Pom-Poms
Credit: Instagram
Pine cones cost nothing if you can collect them yourself, which makes this one of the cheapest ideas on the list. The blue sits only on the tips of the scales.
Skim a dry brush with a little icy blue paint across the top edges and the brown underneath stays visible. That contrast is what makes it look frosty instead of flat.
Small pom-poms in red, lime green, and deep teal are tucked between the scales. Space them out so no two of the same color touch.
Shake off dust and loose bits before you paint, and let the cone dry completely. Pom-poms are small parts, so keep these ornaments away from young children and pets.
Recreate this look
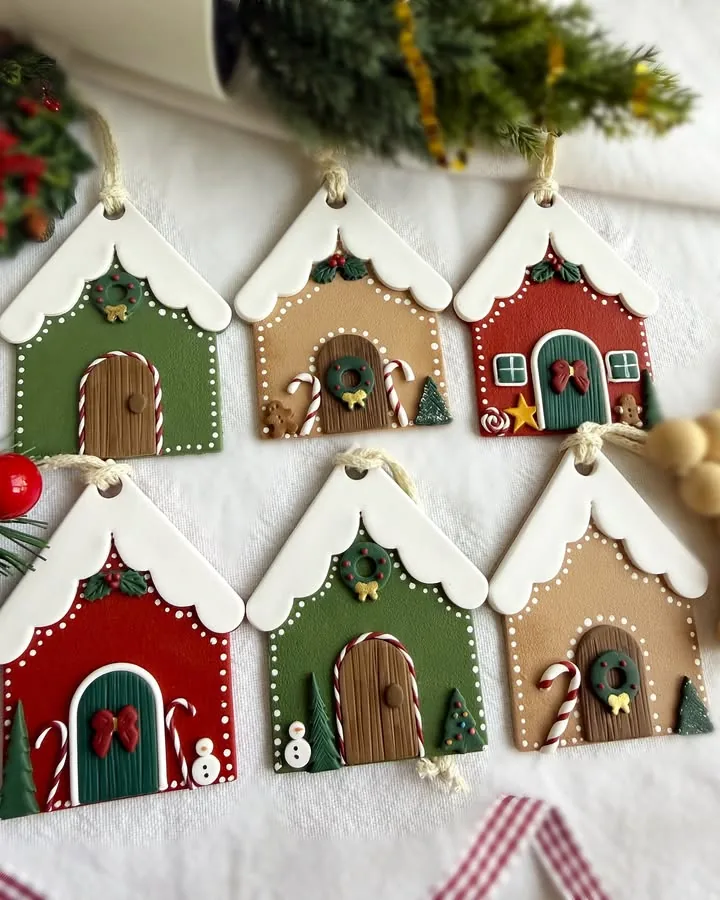
9. Little Cottage Ornaments With Snowy Scalloped Roofs and Dotted Trim
Credit: Instagram
Make one house template, then change the details. All six cottages share the same flat shape: a white scalloped roof, a row of tiny white dots around the edge, and an arched door. What changes is the body color, green, tan, or red, and the small extras like a wreath, a candy cane, a tiny tree, a snowman, or a star.
These look like modeled clay pieces, but you can get the same result by painting flat wooden house shapes. The dotted trim is the easy part. Dip the rounded end of a brush handle in white paint and press, then re-dip every few dots so the sizes stay even.
Paint each door in wood brown or deep teal, then add a round wreath with a dot of gold or a tiny red bow. Keep the extras small and few. Two or three per house is plenty.
One plain house shape with a single flat body color.
A white scalloped roof, a dotted border, an arched door with a wreath, and one small extra like a candy cane or tree.
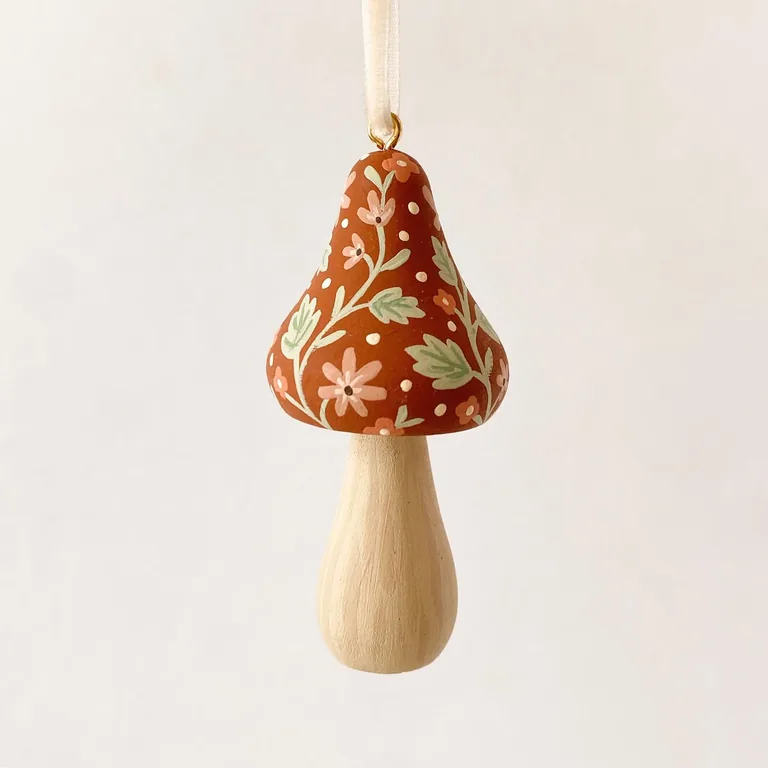
10. Wooden Mushroom Ornaments Painted With Peach Flowers and Mint Vines
Credit: Instagram
Half painted, half bare, and that is the charm. The cap is a deep rust color covered in curling vines, with soft peach flowers, pale mint leaves, and tiny cream dots.
The stem stays plain light wood, which gives the cap room to stand out. A cream ribbon on a small gold hook finishes this woodland piece.
Light paint over a dark base can look streaky, so give the peach and mint a second thin coat. Paint each vine as one curve, add two leaves, then finish with a flower. Dot the centers last.
Leave the stem bare but protect it with a clear matte sealer, following the label. For hand-painted ornaments like this, a fine liner brush makes the vines much easier.
The palette in this ornament
- ▸Rust red for the cap base
- ▸Soft peach for the petals
- ▸Pale mint for the vines and leaves
- ▸Cream for the dots
- ▸Dark brown for the tiny flower centers
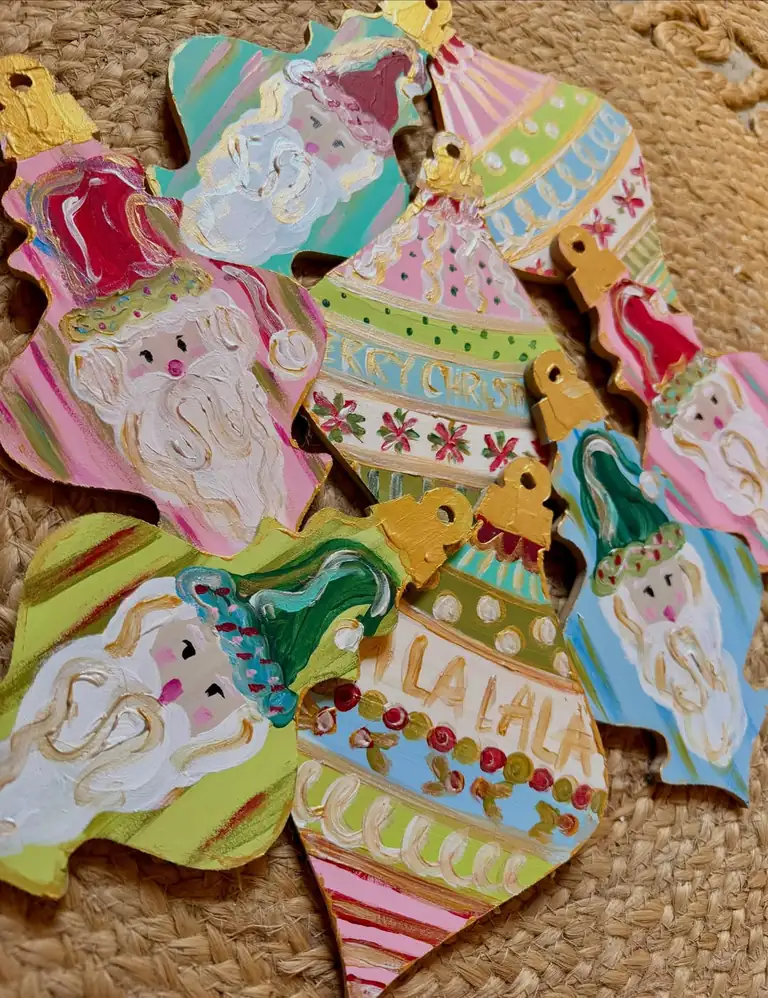
11. Bright Candy-Colored Santas and Vintage Bauble Shapes With Gold Lettering
Credit: Instagram
Loose strokes, candy colors, and no worry about straight lines. That is the whole charm of this pile of wooden cutouts. The shapes copy old-fashioned glass baubles with a cap on top, and the caps are simply painted gold.
Two styles are going on at once:
- Santa faces: striped backgrounds, a thick white beard with gold swirls, pink cheeks, a pink nose, and tiny dot eyes
- Pattern baubles: bands of pink, lime, and sky blue with dots, little berry garlands, and gold lettering that says Merry Christmas or La La La
Thick paint helps here. Let the brush leave texture in the beard.
For the lettering, use a gold paint pen or a liner brush and let the letters wobble a little. On hand-painted wooden Christmas ornaments like these, a wobble reads as charm, so skip the ruler.
See also: 16 English Cottage Christmas Decor Ideas
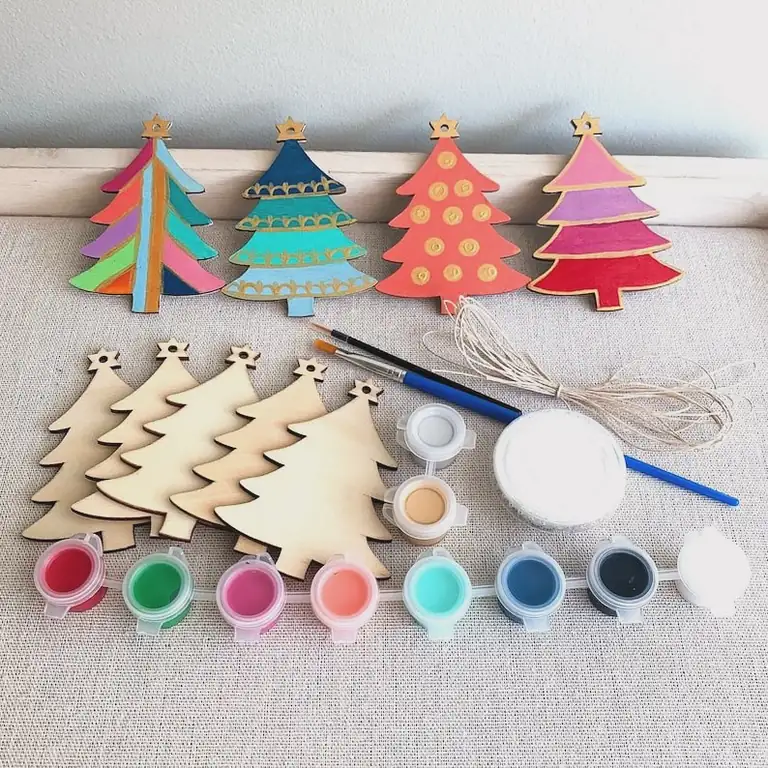
12. Wooden Christmas Tree Ornaments Painted Four Easy Ways
Credit: Instagram
Four finished trees sit above a pile of plain ones, and each uses a different pattern. All four stay beginner friendly because they rely on flat shapes and simple lines instead of fine detail.
Use one color per section and let it dry before painting the section next to it. That keeps the edges from bleeding into each other. Add the gold outlines or dots last with a paint pen.
A row of small paint pots, two brushes, and a stack of plain wood trees is all it takes to make a whole set. It also makes an easy family craft night, since every tree can look different and still match through the gold details. Seal each one with a clear sealer, used as the label says, once the paint is fully dry.
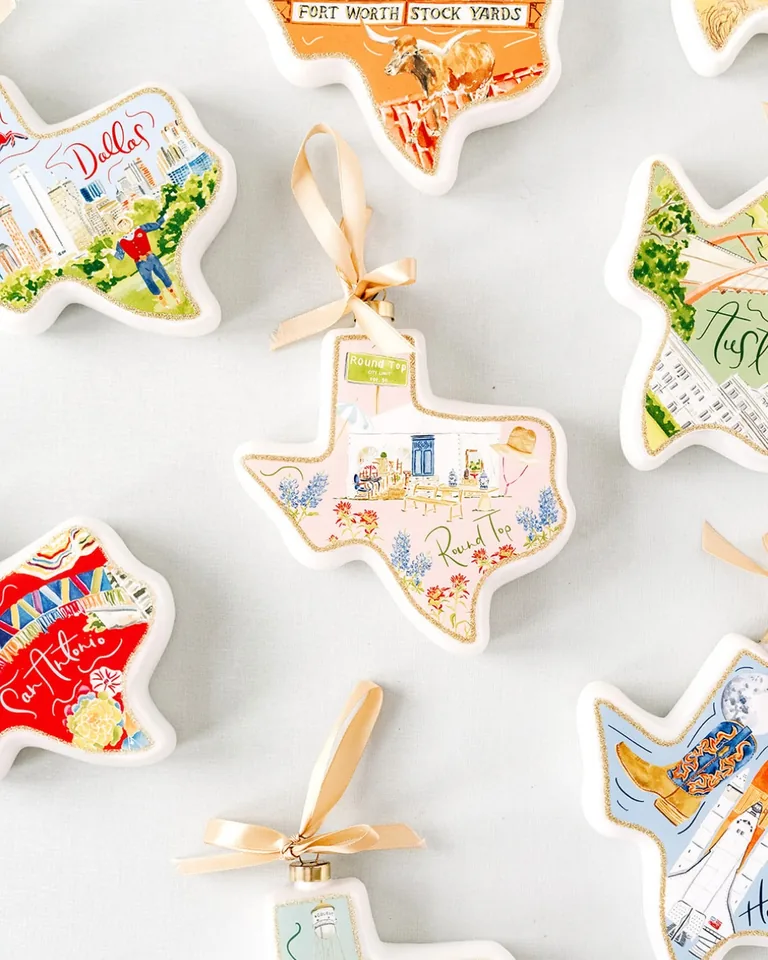
13. Watercolor-Style Hometown Ornaments Shaped Like a State
Credit: Instagram
Hometown pride, shrunk down to ornament size. Each shape here is a state outline with a thin gold glitter edge, and inside sits a tiny scene of one city or town.
There is a skyline with a cowboy, a longhorn at the stockyards, a flea market with wildflowers out front, and a boot beside a space shuttle. The city names are hand-lettered in a loose script, and a champagne satin ribbon hangs each one.
You do not need a state shape to copy the idea. Pick a place that matters to you, like a hometown, a favorite trip, or the street you grew up on. Paint one landmark with a few small extras like flowers or a street sign.
Thin washes of color give the soft watercolor look, so thin your acrylic with a little water. The white shapes look like glossy ceramic, and paint can bead up on slick surfaces.
Wipe the surface clean and use a primer made for glossy surfaces first. It also makes handmade holiday decor that works as a gift for someone who moved away.
Wipe the surface clean, and prime it if it is glossy.
Pencil a light outline of your landmark and the place name.
Paint thin washes of color, letting each one dry before the next.
Add windows, flowers, and lettering with a fine liner brush.
Trace the edge with a gold paint pen, seal it, and tie on a satin ribbon.
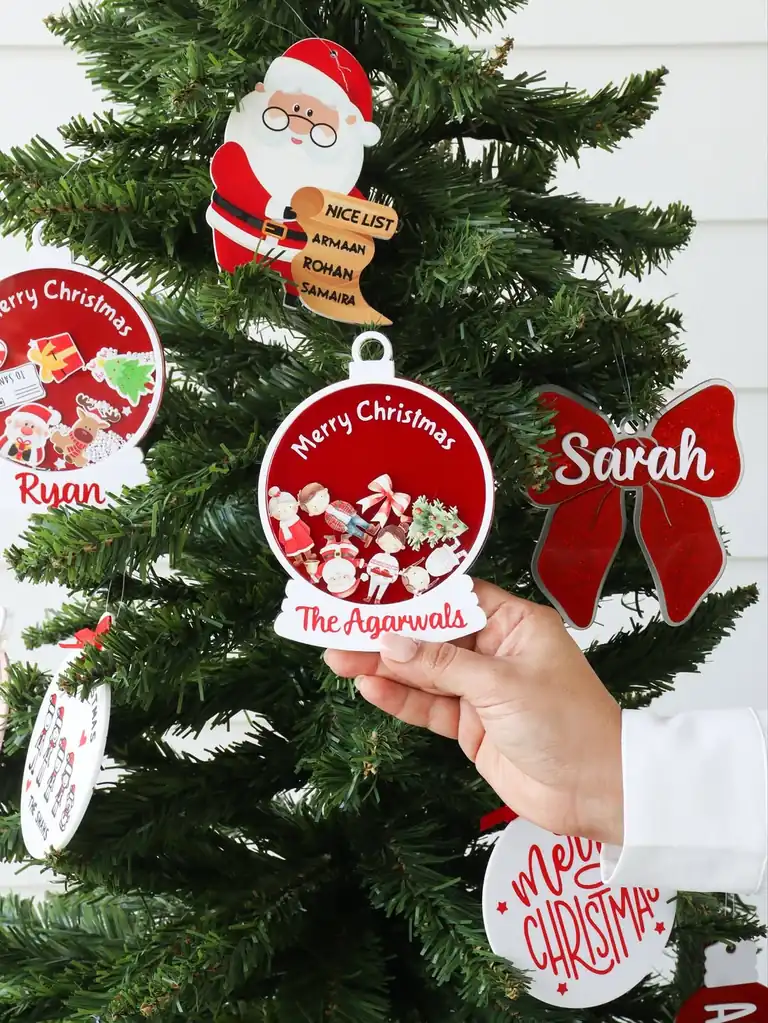
14. Personalized Snow Globe Ornaments Painted With Family Names
Credit: Instagram
Names turn an ornament into a gift. The photo shows three ways to do it: a snow globe shape with a tiny family inside and the family name on the base, a glittery red bow with a first name, and Santa holding a Nice List scroll with three kids’ names. These look printed or cut from acrylic, but the same idea paints up well on wood.
For a painted version:
- Start with a wooden snow globe cutout
- Paint the circle red and add Merry Christmas along the top edge
- Letter the family name on the white base with a red paint pen
Add the year somewhere small and you have a keepsake. One ornament per family member makes simple homemade Christmas decorations for relatives. Keep any tiny added pieces, like little figures, away from young children and pets.
⚠️ Watch Out
Pencil the whole name first and check the spelling and spacing before any paint goes on. Test your sealer on a scrap piece too, since some sealers can smudge paint pen lettering.
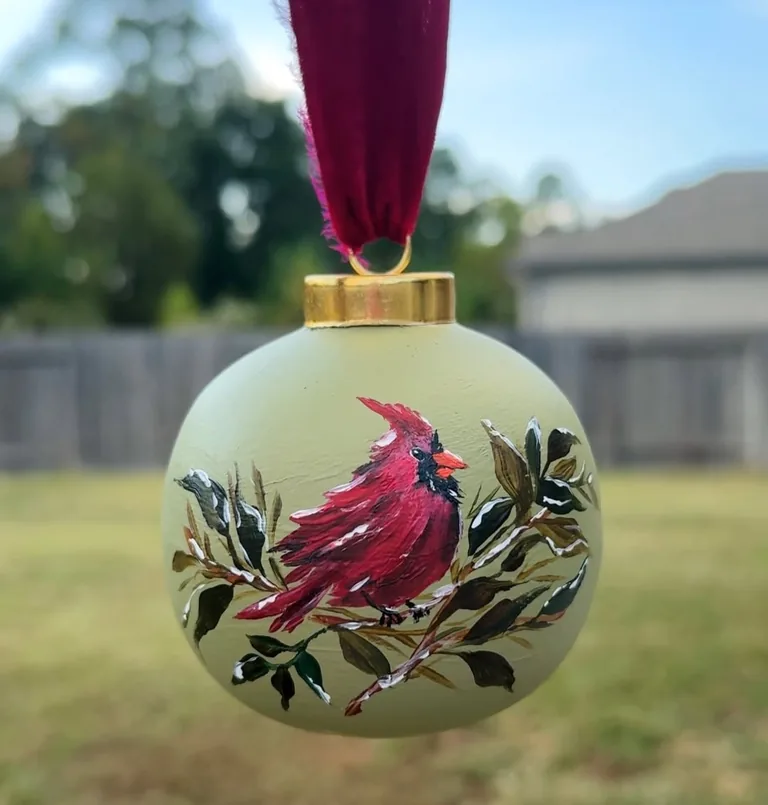
15. Hand-Painted Cardinal Ornaments on Sage Green Baubles
Credit: Instagram
Slow, careful, and worth it. A matte sage green bauble with a gold cap makes a calm background for a red cardinal on a branch. The bird is built from short, quick strokes: dark red first, lighter red on top, and tiny flicks along the wing and tail.
A black face mask and an orange beak finish the head. The dark green and olive leaves get white edges that look like fresh snow, and a burgundy velvet ribbon with a frayed edge hangs the whole thing.
Paint the sage base and let it dry fully before the bird goes on. Sketch the bird lightly or practice on paper first. Do the branch and leaves, then the bird, and add the white snow highlights last.
Painted woodland animals like this take patience more than skill. Clean the bauble well before you start and handle it gently, since glass can break. Seal it with a clear sealer made for the surface once it is dry.
Paint the darkest shapes first, then layer lighter strokes on top.
Use a very small brush for the beak and eye.
Save the white highlights for the end.
Going back over the feathers until the colors turn muddy.
Starting the bird before the base coat is dry.
Painting the face with a big brush.
Final Thoughts
A handmade collection looks best when it follows a plan. Pick one color story, like red and gold or soft pink and cream, and repeat it across every surface. Match the paint to what you are painting, clean and prime first, and let every coat dry fully.
Seal each finished piece with a sealer made for that surface, and follow the label. Handle glass gently and keep small parts away from children and pets.
| Surface | Prep and paint |
|---|---|
| Wood | Sand lightly, add a thin white base coat, then use acrylic paint. |
| Glass | Wipe with rubbing alcohol and use paint labeled for glass. |
| Plastic or glossy ceramic | Clean well, sand lightly or use a primer so the paint grips. |
| Salt dough or air-dry clay | Let it dry fully first, then paint with acrylics. |
| Pine cones | Shake off dust and dry brush acrylic over the scale tips. |
Start with the easy ones, then try a detailed one when you feel ready. Save this post for the next time you want fresh ideas for handmade holiday decor.